
 Development
 QLS
QLS Business
 Healthcare
 Health & Fitness
 Technology
 Teaching
 Lifestyle
 Design


Candles are no longer just a source of light. They’ve become part of how we relax, decorate our homes, celebrate moments, and even build small businesses. Whether you’re curious about making candles for personal use, gifting, sustainability, or profit, learning how to make candles at home is one of the most approachable and rewarding DIY skills you can pick up.
This guide is designed to be the most complete candle-making resource available online. It brings together beginner fundamentals, technical detail, safety guidance, sustainability considerations, and practical troubleshooting all in one place.
If you’ve ever searched for “candles” or “how to make candles” and felt overwhelmed by scattered advice, this article is for you.
Why Make Candles at Home?
Making candles at home gives you full control over:
- Ingredients
- Scents
- Burn quality
- Cost
- Environmental impact
Store-bought candles especially natural or luxury ones can be surprisingly expensive. Homemade candles, on the other hand, allow you to create cleaner, longer-lasting candles at a fraction of the cost, while also giving you the freedom to customise every detail.
Beyond cost savings, candle making is:
- Beginner-friendly
- Therapeutic
- Creative
- Easy to scale (from hobby to business)
Candle Making Basics: What You Need to Know Before You Start
Before melting wax, it’s important to understand that candle making is part craft, part science. Small changes in temperature, ratios, or materials can dramatically affect the final result.
The good news? Once you understand the fundamentals, candle making becomes predictable and repeatable.
Candle Making Supplies: Complete Beginner Checklist
You don’t need professional equipment to get started. Most successful candle makers began with basic tools.
Essential Supplies for Making Candles
Wax (Choose one):
- Soy wax
- Beeswax
- Paraffin wax
- Coconut wax
- Wax blends
Wicks:
- Cotton wicks
- Paper-core wicks
- Hemp wicks
- Wood wicks
Containers or Molds:
- Glass jars (mason jars, jam jars, candle jars)
- Tin containers
- Heat-safe ceramic or porcelain
- Silicone candle molds (for pillar or sculptural candles)
Equipment:
- Double boiler (or saucepan + heat-safe bowl)
- Thermometer (candy or digital)
- Kitchen scale (highly recommended)
- Heat-resistant stirring utensil
- Wick stickers or hot glue
- Wick holders (clothespins, chopsticks, pencils)
Optional Add-Ons:
- Essential oils or fragrance oils
- Candle dyes (not food dye)
- Dried herbs (decorative use only, with caution)
Understanding Candle Wax (This Choice Matters)
Your choice of wax directly affects:
- Burn time
- Scent strength
- Appearance
- Sustainability
- Ease of use
Soy Wax
Soy wax is one of the most popular options for homemade candles. Soy wax is ideal for container candles and first-time candle makers.
Pros
- Renewable and biodegradable
- Clean-burning with minimal soot
- Beginner-friendly
- Affordable
Cons
- Natural frosting can occur
- Slightly weaker scent throw than paraffin
Common early signs include.
Beeswax
Beeswax is a natural wax with a long history. Beeswax is excellent for pillar and taper candles.
Pros
- Naturally scented (light honey aroma)
- Long burn time
- Clean burn
- Naturally air-purifying
Cons
- More expensive
- Higher melting and pouring temperatures
- Harder to scent strongly
Paraffin Wax
Paraffin wax is widely used in commercial candles.
Pros
- Excellent scent throw
- Low cost
- Holds colour well
Cons
- Petroleum-based
- Less eco-friendly
- Can produce soot if poorly wicked
Coconut Wax
Coconut wax is often blended with other waxes.
Pros
- Very clean burn
- Luxurious finish
- Good scent throw
Cons
- Expensive
- Usually requires blending
Choosing the Right Wick (Most Beginners Get This Wrong)
The wick is the engine of your candle. A poor wick choice can ruin even the best wax.
Why Wick Size Matters
- Too small → tunnelling
- Too large → soot, mushrooming, high flames
Wick size depends on:
- Container diameter
- Wax type
- Fragrance load
Most suppliers provide wick size charts follow them.
What Is a Scent Throw?
Scent throw refers to how far a candle’s fragrance travels.
There are two types:
- Cold throw: scent when candle is unlit
- Hot throw: scent when candle is burning
Scent throw depends on:
- Wax type
- Wick thickness
- Fragrance ratio
- Temperature when fragrance is added
General guideline:
- 1 ounce of fragrance per 1 pound of wax (about 6–7%)
Adding more fragrance does not guarantee a stronger scent and can damage candle performance.
How to Make Candles at Home: Step-by-Step Process
Step 1: Prepare Your Workspace
Work on a flat, stable surface away from drafts. Keep flammable items away and ensure good ventilation.
Line surfaces with paper towels or newspaper for easy cleanup.
Step 2: Measure the Wax Correctly
Fill your candle container with dry wax flakes, then double the amount.
Why? Melted wax takes up less space than solid wax.
Using a scale is the most accurate method and ensures correct fragrance ratios later.
Step 3: Melt the Wax Safely
Always use a double boiler. Never melt wax directly on a stovetop flame.
Target temperatures:
- Soy wax: 160–185°F (71–85°C)
- Beeswax: 170–185°F (77–85°C)
- Paraffin: 150–170°F (65–77°C)
Stir gently to ensure even melting.
Step 4: Add Fragrance at the Right Time
Remove wax from heat before adding fragrance.
Adding fragrance too early causes evaporation and weak scent throw.
Stir slowly for 30–60 seconds to fully bind fragrance to wax.
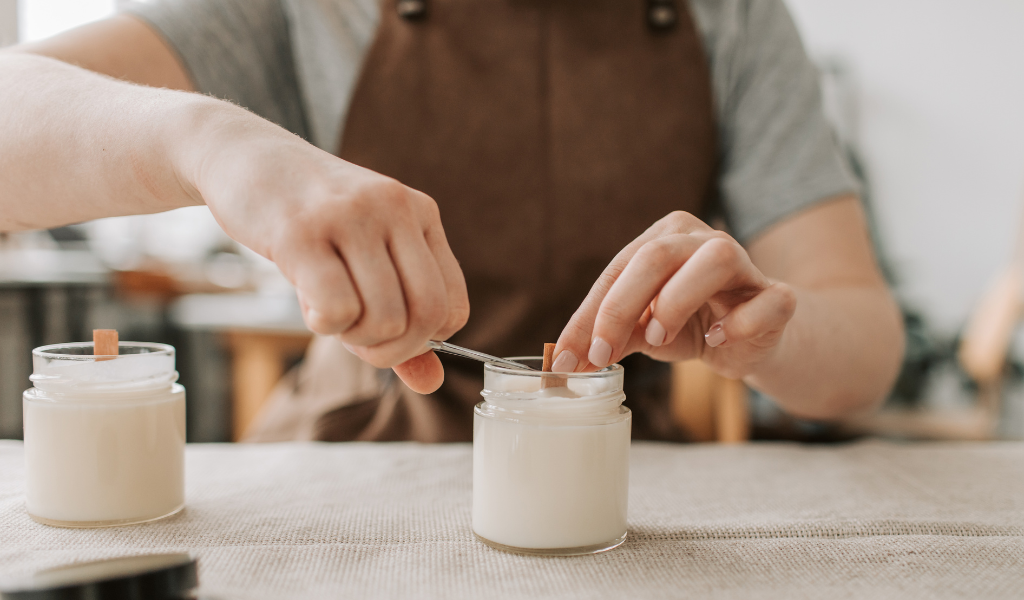
Step 5: Secure the Wick
Attach the wick to the center of your container using a wick sticker or a small amount of melted wax.
Use a clothespin, pencil, or chopsticks to keep the wick upright and centered.
Step 6: Pour the Wax
Allow wax to cool slightly before pouring (usually around 125–140°F / 50–60°C).
Pour slowly to avoid air bubbles and surface imperfections.
Step 7: Let the Candle Set and Cure
Do not move candles while they cool.
Typical curing times:
- Soy wax: 2–7 days
- Beeswax: up to 10 days
- Paraffin: 1–2 days
Trim the wick to about ¼ inch before burning.
Common Candle-Making Problems (And Exactly How to Fix Them)
Even experienced candle makers run into issues. The difference between a beginner and a confident candle maker is knowing why problems happen and how to fix them.
Sinkholes
Sinkholes appear as small dips or holes around the wick after cooling. They happen because wax contracts as it sets, especially with soy wax.
How to fix it:
- Save a small amount of melted wax
- Once the candle cools, reheat the extra wax
- Pour a thin “top-up” layer to fill the hole
Sinkholes are cosmetic and do not affect how the candle burns.
Tunneling
Tunneling occurs when the candle only melts in the center, leaving unused wax along the sides.
Causes:
- Wick too small
- First burn too short
How to prevent it:
- Burn the candle long enough on the first use so the melted wax reaches the edges
- Follow the rule of one hour of burn time per inch of candle diameter
Weak Scent Throw
If your candle smells great cold but weak when burning, the issue is usually technical.
Common causes:
- Adding fragrance at too high a temperature
- Incorrect fragrance ratio
- Insufficient curing time
- Wax type that doesn’t hold scent well
Fixes:
- Add fragrance around 140°F (60°C)
- Use 6–7% fragrance load unless your wax allows more
- Let soy candles cure for several days before burning
Frosting on Soy Candles
Frosting appears as white, crystal-like patches on soy candles. This is a natural characteristic of soy wax.
Important note:
Frosting does not affect performance.
How to reduce it:
- Pour at lower temperatures
- Let candles cool slowly at room temperature
- Avoid sudden temperature changes
Mushrooming Wicks
A mushroom-shaped carbon build-up on the wick tip indicates a wick that’s too large or untrimmed.
Fixes:
- Trim wicks to ¼ inch before every burn
- Switch to a smaller wick size if mushrooming continues
Container Candles vs Molded Candles
Understanding candle types helps you choose the right method.
Container Candles
These are the easiest and most forgiving candles to make.
Best for:
- Beginners
- Soy and coconut wax
- Scented candles
The container supports the wax, reducing cracking and shrinkage issues.
Molded Candles
Molded candles (pillars, tapers, sculptural candles) require firmer wax and more precision.
Key differences:
- No container
- Higher pouring temperatures
- Harder wax preferred (beeswax or blends)
- Silicone molds are reusable and beginner-friendly
Molded candles are decorative and popular for gifting.
Candle Safety Rules You Should Always Follow
Candle making is safe when done properly, but hot wax demands respect.
During Candle Making:
- Never melt wax directly on a flame
- Never leave melting wax unattended
- Keep children and pets out of the workspace
- Work in a well-ventilated area
- Wear closed-toe shoes and long sleeves if possible
During Candle Burning:
- Trim the wick before every burn
- Burn candles on stable, heat-resistant surfaces
- Never burn longer than 4 hours at a time
- Keep candles away from drafts, curtains, and paper
- Never leave a burning candle unattended
Eco-Friendly Candle Making: Cleaner Candles at Home
Sustainability is one of the biggest reasons people choose homemade candles.
How to Make Eco-Friendly Candles:
- Use soy, beeswax, or coconut wax
- Choose cotton or wood wicks
- Repurpose glass jars, tins, or ceramic containers
- Avoid paraffin if sustainability is a priority
- Skip unnecessary dyes and heavy fragrance loads
Eco-friendly candles burn cleaner and appeal to environmentally conscious buyers.
Is It Cheaper to Make Your Own Candles?
In most cases, yes especially for natural candles.
Typical Cost Breakdown
- Soy wax (5 lbs): $20–25
- Wicks (bulk): $8–12
- Fragrance oils: $6–15
- Containers: often free (reused jars)
With a modest upfront investment, you can make multiple candles for the price of one premium store-bought candle.
Can You Turn Candle Making Into a Business?
Absolutely. Candle making is one of the most accessible small manufacturing businesses.
Popular niches include:
- Eco-friendly candles
- Aromatherapy candles
- Luxury or minimalist candles
- Gift sets and seasonal candles
- Sculptural and decorative candles
Final Thoughts: Why Candle Making Is Worth Learning
Candle making combines creativity, patience, and practicality. It’s easy to start, inexpensive to scale, and endlessly customizable.
Once you understand the basics wax choice, wick sizing, fragrance ratios, and temperature control candles stop being mysterious and start becoming reliable.
Whether you’re making candles for your home, gifts, sustainability, or business, the skill pays off every time you light one.
For families with a Deaf child, learning BSL together can be transformative.
Frequently Asked Questions (FAQ)
Candles are made from wax, a wick, and optionally fragrance and dye. Common waxes include soy, beeswax, paraffin, coconut, and blends.
Soy wax is the best option for beginners. It’s forgiving, affordable, clean-burning, and easy to scent.
A general rule is 1 ounce of fragrance per 1 pound of wax (about 6–7%). Always follow your wax supplier’s guidelines.
Yes, but essential oils tend to produce a lighter scent than fragrance oils. Some evaporate quickly at high temperatures.
Cracks usually form when wax cools too quickly. Let candles cool slowly at room temperature and avoid drafts.
Curing improves scent throw and burn quality but here are the estimates:
- Soy candles: 2–7 days
- Beeswax candles: up to 10 days
- Paraffin candles: 1–2 days
Yes. Place jars in hot water or the freezer to remove old wax, clean thoroughly, and reuse.
Smoking is usually caused by an untrimmed or oversized wick. Trim wicks to ¼ inch before lighting.
Burn long enough to create a full melt pool across the surface usually one hour per inch of candle diameter.
Yes, when made and burned correctly. Follow proper wick sizing, fragrance ratios, and safety rules.
0 responses on "How to Make Candles: The Ultimate Beginner-to-Expert Guide to Candles at Home"